VCloud.ai License Plate Recognition VCA
Vehicle License Plates Recognition Module
Main functionality:
- License plates recognition accuracy up to 99%.
- ANPR system can read license plates of vehicles traveling at speed up to 250 km/h.
- Recognition of vehicle brands, models, and colors with accuracy 95%.
- More than 60 countries supported.
- Support for one- and two-line, regular, reverse, and special types of license plates.
- Real-time notifications based on alarms from recognized license plates.
- Notifications in Telegram, by SMS or email.
- Restricted access to notifications for a pre-defined group of users.
- Unified database of registered vehicles.
- Ability to build reports on an hourly, daily, weekly, or monthly basis.
- Support for import (CSV) and export of vehicle databases (EXCEL, PDF, CSV, JSON).
Camera Installation Guidelines
The detection rate and accuracy of an ALPR system strongly depend on the quality of the images captured by the camera. Main condition is that the camera should capture images of license plates with close to perfect sharpness and contrast, day and night and in different weather conditions. This manual describes the key requirements for license plate recognition including hardware, installation, and configuration.
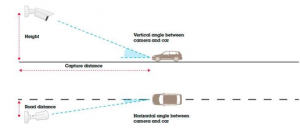
It is recommended to minimize the angle between the camera and the travel direction of the car, as shown in Picture 1. Ideally, you should place the camera right above the vehicles, or not too high. It is, however, a good idea to place the camera higher than the car headlights, to avoid blinding the camera with strong light.
Picture 1
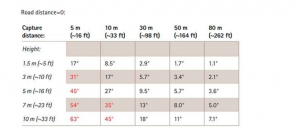
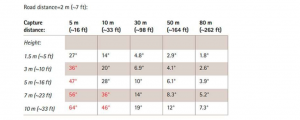
The total angle between the camera and the travel direction of the car can be estimated from Tables 1 and 2. We recommend keeping the total angle below 30°.
Table 1.
Table 2.
Camera alignment
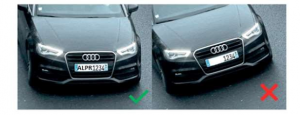
The camera should be pointed at the road so that the relevant lanes are centered in the image. It should be zoomed in to cover the required number of lanes. The roll angle of the camera should be adjusted so that the license plate is parallel to the edges of the image, see Picture 2.
Picture 2.


