Cluebase VMS Installation Manual
Installation manual Contents
Preparation
Download cluebase.zip from https://vcloud.ai/downloads and unzip the file. Please note that in some versions of Linux the unzip application is not included so you'll need to install it separately with the following command:
sudo apt install unzip
Now unzip the Cluebase VMS installer with the following command:
sudo unzip cluebase.zip
The above command creates a directory containing the installation files.
Go to CluebaseVMS directory:
cd CluebaseVMS
Now you have to provide permissions to the installation script (install.sh):
sudo chmod +x install.sh
You are all set for the installation.
Automatic installation
Docker container framework and Docker-compose extension are required for Cluebase VMS installation and operation.
Installing on Linux
Please run the install.sh script to automatically install Cluebase VMS on a clean Linux OS.
To run the script, please go to the folder containing “install.sh” and run the following command:
$ sudo sh install.sh
Installing the SSL version
Here are the steps to install Cluebase VMS with SSL encryption:
- Download Cluebase VMS SSL installer . Please note that it comes as a separate install package and available at https://vcloud.ai/downloads
- Prepare SSL certificate and public key that are generated for the required domain name.
- Unzip the installation package.
- Navigate to 'certs' directory in the installation package.
- Copy the SSL certificate and public key (file should be named as follows: cert.crt - SSL certificate, cert.key - public). The existing files should be replaced or removed before
- Provide permissions to the installation script by this command:
sudo chmod +x install.sh
7. Run the installation script:
$ sudo sh install.sh
Manual installation
Installing Docker on Linux
Official Docker installation guide: https://docs.docker.com/engine/install/ubuntu/
Run the following command:
$ sudo apt-get update && apt-get install docker-ce docker-ce-cli containerd.io
Installing docker-compose on Linux
Run the following command:
$ sudo curl -L "https://github.com/docker/compose/releases/download/1.29.2/docker-compose-$(uname -s)-$(uname -m)" -o /usr/local/bin/docker-compose
Grant the necessary access rights by running the following command:
$ sudo chmod +x /usr/local/bin/docker-compose
Preparation for manual VMS installation
You will need to edit the environment variable file, the .env file, to successfully install the VMS.
Please note that this file is hidden in the folder by default.
Open the .env file and specify the server's IP address in the following fields:
APP_HOST=0.0.0.0 (the server's public IP address) MACHINE_HOST=0.0.0.0 (local IP address of the server)
If the VMS should only be used in the local network, both IP addresses will be the same.
Using a custom port for the VMS
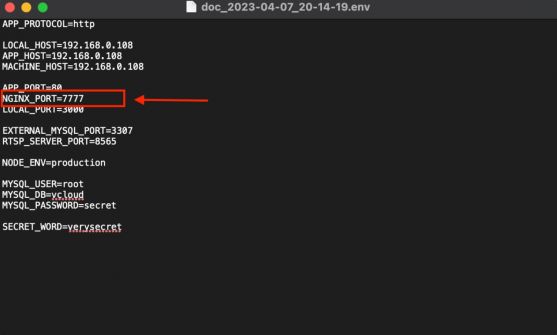
By default the VMS installs and runs on port 80. However you can configure a different port by amending the .env file.
Open the .env file and add NGINX_PORT variable and it's value (port number) as shown on the screenshot.
Installing and running VMS
Enter the VMS folder and run the following command:
$ sudo docker-compose up -d
This command will automatically download, install and run VMS.
Failover
Description
Cluebase VMS supports failover (hot swap) functionality as the following options:
- 1 to 1 - every server in the system has a failover server
- Many to 1 - several servers can be hot-swapped by 1 failover server
- Many to Many - several servers can be hot-swapped by several failover servers
Important
- In case of using the failover functionality it’s important to make sure that network storage is being used (Object storage or NAS)
- Failover server hardware should be able to handle the required number of cameras so the failover servers’ hardware should be precisely calculated and configured.
- Configuration is automatically sent from main server to failover every 5 minutes
- Please note that shutting down the main server manually is considered as maintenance and will not initiate the failover process.
- After switching back from failover server to the main server it is required to reset failover server's configuration or reboot.
Setup
To set up a failover system you need to have at least 1 main server and 1 failover server.
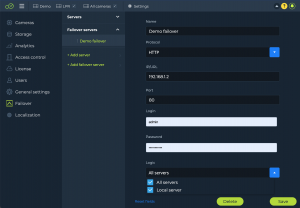
Go to the main server user interface and open Failover settings: Settings->Failover->Add Failover Server and fill the fields with Failover server credentials. In the Logic field choose the server or servers that should be hot-swapped by the current Failover server. Then click Save.
Sign in
Open a web browser (Google Chrome, Mozilla Firefox and Safari are recommended), enter the server's IP address and press Enter.
By default login and password: admin/admin.
Stopping the VMS
Run the following command from the VMS folder to stop the VMS server:
$ sudo ./stop.sh
Updating VMS
To update VMS version:
$ sudo ./update.sh
3.Start VMS:
$ sudo ./start.sh


