VCloud.ai Object Detection VCA
Object Detection - Module Object Detection
Main functionality:
   • Various complexity objects detection (people, vehicles, animals, things

   • Control the time and type of object that are in the zone.

   • Location rules violations detection

   • Photo recording and notifications about rules violations sending

   • Storing of collected data on parking mode violators in the database

   • Ability to receive notifications about events in Telegram, SMS, or email
Product Description
The Object Detection module is intended for notification of rules violation for objects staying in the objects detection zone (person, animal, vehicle, item).
Notifications sending is performed depending on the time interval and set rule. Notifications are sent when the object is staying in the zone above the specified time period if there is no object in the zone above the specified period, or an object missing in the zone within a certain time frame.
System requirements
It is necessary to have the minimum system requirements for one video stream for Object detection module installation on GPU as in the table below.
| Parameter | Recommended value |
|---|---|
| CPU | Intel Core i5-5575 or higher |
| RAM | 3 GB RAM |
| GPU | NVIDIA 1030 |
| Places for archive | up to 3 GB per day (~4.5 k detections) |
| Operating system | Ubuntu 18.04.3 LTS (Bionic Beaver) |
Analytics
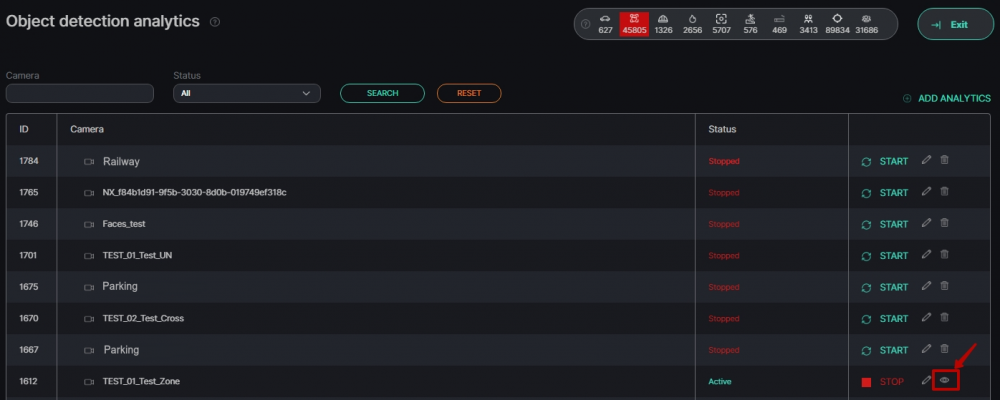
To view object detection analytics, select the item Object Detection in the menu on the left and go to the Analytics section.
Analytics adding
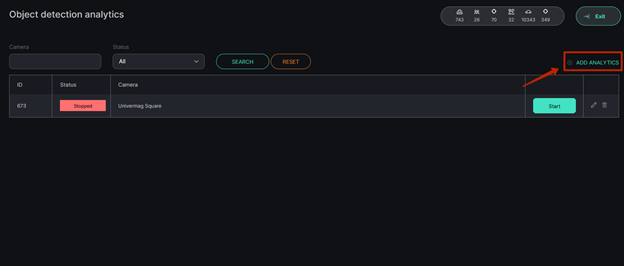
The page displays a list of analytics with the status and the ability to edit, add, or delete analytics. In order to add a new Object Detection analytics, press Add Analytics in the upper-right corner of the screen.
When press <Add Analytics the form of analytic adding is opened.
By pressing the Update Video Frame button you can see a frame in real-time in the field of frame addition. It is possible if a video stream was selected.
To add analytics it is necessary to fill the following fields:
| Field name | Description |
|---|---|
| Video | Press in the field and select the camera name from a drop-down list. Videostream will be used to create analytics. |
| Send notifications if an object is detected | To send notifications about detected faces to external resources, check the box. Select an event with parameters for notifications sending to third-party resources. |
| Events | Select an event from the drop-down list. Notifications will be sent to the services specified in the event for this event |
| Additional parameters | If necessary, it is possible to add additional parameters for further use when event creating. Fill in the parameter fields. To add parameters, press the "+" button. To remove parameters, press " -". |
Adding of the object detection area
   • Add a camera to Video Stream

   • Frame from the added camera will appear below Video Stream

   • Add an object definition area.
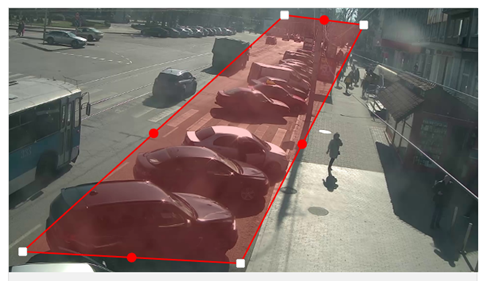
a) When you press the frame, a point appears. When you move the mouse cursor, a line appears. When you press on the frame again, a second point appears that is connected by a line to the first point. To create an area, it is necessary to connect three or more points. To close the region, it is necessary to press twice with the mouse in the same place.
The created area displays starting points that are shaped like white squares and points in the middle of lines that are shaped like red circles. If you hold down the left mouse button on the white point, it is possible to change the zone shape by moving the mouse cursor.
When you hold the red point, it is possible to stretch or compress the area strictly along the line where the point is located. If press on the red point twice with the left mouse button, the red point will turn white.
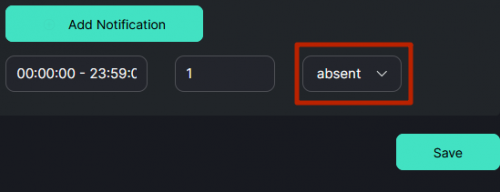
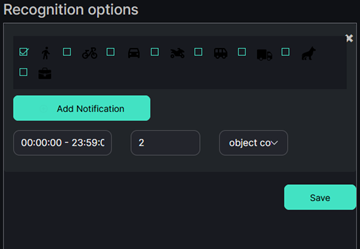
b) A form will appear on the right side of the screen with images of objects, Add notification button, with time field, waiting parameter, and notification marker. To create the analytics, just select the object types and press Save.
Filling of Form Fields:
- Field with a time period. This field is required for setting the time period. Notifications will be sent for the specified period. If the described action does not occur during the specified period, the system will not receive notifications.
- Field with the waiting parameter. Value in this field is set depending on the marker. For Absent and At least once, this field specifies the minimum value of the allowed object detection. If the object is present for less than the specified time in the zone, the notification will not be sent. For Present, this field sets the minimum value for the allowed absence of Object Detection. If the object is not detected for less than the specified time, notifications will not be sent. Set numeric value is the number of seconds.
- Field with notification marker. There are three markers: Present, Absent, and At least once. When setting Absent, notifications will be sent if the Object Detection is set in the zone for a certain time. When you set the Present marker, notifications will be sent if the object is not in the detection zone. With a marker At least once, notifications will be sent if the object is not in the zone during the period specified in the time field.
You can create more objects detection areas by repeating points a) and b).
To create the analytics, press Save.
Analytics editing
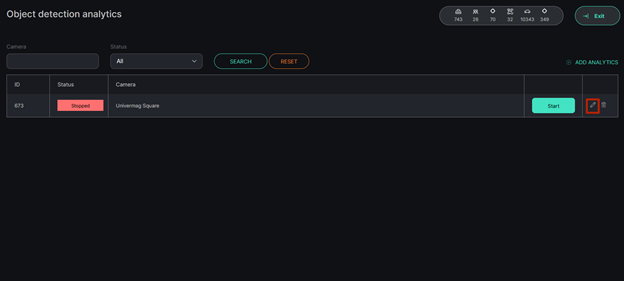
To open the object detection editing window, press the edit icon on the right side of object detection analytics in a zone.
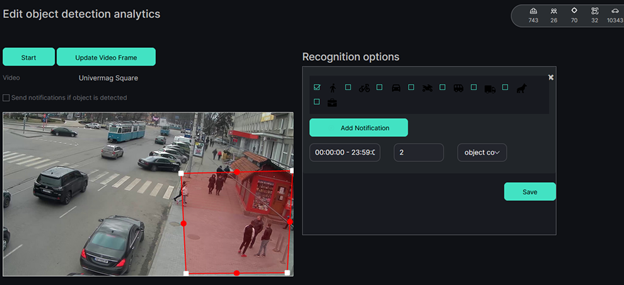
When you press the edit icon, the object detection analytics editing form is opened.
It is possible to change the analytics if it is not running.
In order to run analytics, press Start. To stop analytics, press Stop.
By pressing the Update Video Frame button you can see a frame in real-time in the field of frame addition. It is possible if a video stream was selected.
System user can change the following fields:
| Field name | Description |
|---|---|
| Send notifications if object is detected | To send notifications about detected faces to external resources, check the box. Select an event with parameters for notifications sending to third-party resources. |
| Events | Select an event from the drop-down list. Notifications will be sent to the services specified in the event for this event |
| Additional parameters | If necessary, it is possible to add additional parameters for further use when event creating. Fill in the parameter fields. To add parameters, press the "+" button. To remove parameters, press " -". |
Changing or Adding the Object Detection Area
• Change or add the object detection area.
a) When you press the frame, a point appears. When you move the mouse cursor, a line appears. When you press on the frame again, a second point appears that is connected by a line to the first point. To create an area, it is necessary to connect three or more points. To close the region, it is necessary to press twice with the mouse in the same place.
The created area displays starting points that are shaped like white squares and points in the middle of lines that are shaped like red circles. If you hold down the left mouse button on the white point, it is possible to change the zone shape by moving the mouse cursor. When you hold the red point, it is possible to stretch or compress the area strictly along the line where the point is located. If press on the red point twice with the left mouse button, the red point will turn white.
b) in the right part of the screen it is possible to edit or add a form with objects images. To create the analytics, just select the object types and press Save.
Filling of Form Fields:
- Field with a time period. This field is required for setting the time period. Notifications will be sent for the specified period. If the described action does not occur during the specified period, the system will not receive notifications.
- Field with the waiting parameter. Value in this field is set depending on the marker. For Absent and At least once, this field specifies the minimum value of the allowed object detection. If the object is present for less than the specified time in the zone, the notification will not be sent. For Present, this field sets the minimum value for the allowed absence of Object Detection. If the object is not detected for less than the specified time, notifications will not be sent. Set numeric value is the number of seconds.
- Field with notification marker. There are three markers: Present, Absent and At least once. When setting Absent, notifications will be sent if the Object Detection is set in the zone for a certain time. When you set the Present marker, notifications will be sent if the object is not in the detection zone. With a marker At least once, notifications will be sent if the object is not in the zone during the period specified in the time field.
You can create more objects detection areas by repeating points a) and b).
Click on the Save button to save changes.
Analytics viewing
To view Object detection analytics, press the View icon on the right side of the Videostream field.
It is possible to view only active video streams.
In the opened window you can view the video from the camera in real-time.
Pic
There are records of detected objects in the table below, which includes Camera, Detection Time, and Accepted by columns.
| Column name | Description |
|---|---|
| Camera | Here you can look at the camera location and a frame of a detected object |
| Detection Time | The time the camera detects an object |
| Accepted by | Press on the ACCEPT button to accept the notification. After that, an username will appear in this field instead of the button |
Press on the Frame icon to look closer at the detected object.
Pic
To download an image of a detected object, press Save image.
Pic
Analytics search
The search field is located at the top of the Analytics page.
Pic
To find the necessary analytics, enter the name or status of analytics.
To start the search press the Search button. To clear the settings, press Reset.
| Search Field | Parameters |
|---|---|
| Camera | It is possible to enter video stream name or part of the name in this field |
| Status | Select the Analytics status from the drop-down list |
Analytics start and stop
To start analytics, press the Start button on the right side with the analytics name field. To stop analytics, press the Stop button.
Pic
Analytics deletion
To delete analytics, press the delete icon on the right side of the analytics field.
Pic
In opened window press Yes to confirm the deletion or No to cancel the deletion.
Events
This section is intended for viewing the history of notifications about detected (missing) objects (people, animals, vehicles, things).
Pic
Search for notifications and events
There is a search field at the top of the screen
Pic
| Search field | Parameters |
|---|---|
| Period | Press on the field and select the desired time period. |
| Camera | Press on the field and select the camera you want to receive notifications for from the drop-down list. |
| Object type | Press on the field and select the desired object type. |
Press Search to display the search results. Press Reset to clear the input fields.
To view the location and direction of the camera, press Pic
Pic
To accept notifications, press Accept on the right side of the record table.
Working with notification records
To go to the view in the record list format, press the icon in the upper-right corner.
Pic
To return to the grid type, press the icon
Pic
To enlarge a frame with a violation, press the photo of interest (when using the grid view) or press on the icon Pic to enlarge the frame when using the list view.
Pic
To save an image, press Save Image.

