Cluebase VMS User Manual
Introduction
Cluebase VMS (video management system) is a comprehensive software solution designed to connect video surveillance cameras to a server infrastructure. It enables a wide range of features including video recording, live streaming, AI-powered video analytics, access control integration, fire alarm connectivity, IoT device management, and many other advanced functions tailored to modern security and automation needs. The system supports on-premise, hybrid and cloud deployments, making it suitable for small-scale installations as well as large, distributed enterprise environments.
Built with flexibility and scalability in mind, Cluebase VMS operates as an open-platform solution, ensuring compatibility with a wide variety of hardware and third-party systems. Whether you’re deploying a single building installation or managing a multi-site network of cameras and sensors, Cluebase VMS delivers the tools needed for reliable monitoring, rapid response, and intelligent automation.
Cluebase VMS is distributed as a commercial product under an End User License Agreement (EULA), which outlines usage rights, distribution terms, and licensing conditions.
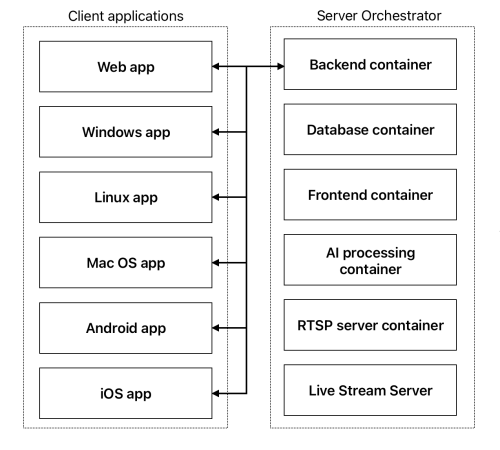
Cluebase VMS is designed as a modular, scalable video management platform running in a Docker Compose orchestration environment. The architecture separates core system functions into individual containers, enabling efficient deployment, easy updates, and platform independence.
All backend functionality is containerized and orchestrated using Docker Compose. Each component is isolated for stability, scalability, and portability:
Backend Container - Handles API logic, authentication, and system logic. Communicates with the database, frontend, and client apps.
Database Container - Stores all configuration data, logs, event history, user accounts, and system states.
Frontend Container - Delivers the web-based user interface.
AI Processing Container - Runs video analytics tasks such as object detection, classification, and behavioral analytics. Utilizes GPU acceleration when available.
RTSP Server Container - Acts as RTSP source server for re-streamed cameras.
Live Stream Server - Handles WS, WebRTC or HLS streams for real-time preview, multi-client viewing, and mobile compatibility.
Ports used by Cluebase VMS: 80, 554, 2001, 8550-8599, 3000-3999, 443, 20000-40000
Hardware and Software requirements
Minimal server requirements: Quad-core ARM or Intel/AMD (32 or 64 bit), 4GB RAM, 2GB HDD/SSD.
Desktop client requires a PC or Mac computer with Intel/AMD 32 or 64 bit, Apple Silicon or other ARM CPU with at least 2 cores of 1.5 GHz each.
Supported browsers: Google Chrome v.92+, Mozilla Firefox v.90+, Safari v.14+
Hardware calculator is available for precise VMS resource calculations.
Operation systems supported:
- Desktop and server versions of Ubuntu 18.04 or later versions, for GPU usage we recommend Ubuntu 22.04,
- Windows 11 or later with WSL, Windows Server 2016 or later with WSL.
⚠️ Please note that the network must be set to static IP address. In case of IP address change it is required to stop the server and run newIP.sh script.
Compatibility
Codecs: Cluebase VMS is ready to work with any h.264 and h.265 video streams.
All IP cameras and DVR/NVR are compliant.
Cameras and NVRs connect to Cluebase VMS via ONVIF, RTSP or native protocols.
Client app installation
Please note that Web client application is available instantly by accessing the server’s IP address via a web-browser. However is you need to install a client application on you desktop they available for downloading at https://vcloud.ai/downloads
Installing Linux app
Once you’ve downloaded file Cluebase_VMS_Linux_x_x.deb you can install it from the UI by double-clicking and following the screen instructions or you can do it from the command line:
sudo apt install Cluebase_ VMS_Linux_x_x.deb
Installing Windows app
Once you’ve downloaded file Cluebase_VMS_WIN_x_x.exe you can install it from the UI by double-clicking and following the screen instructions.
Installing MacOS app
Once you’ve downloaded file Cluebase_VMS_MacOS_x_x.dmg you can install it from the UI by double-clicking and following the screen instructions.
Signing in
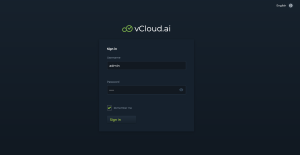
After running the application for the first time you should see the Sign in screen.
The Sign In Page provides secure access to the Cluebase VMS interface. Only authorized users with valid credentials can log in to manage or monitor the system.
Fields and Controls
Username - Enter your account username. Default administrative user: admin (can be changed later in settings).
Password - Enter your corresponding password. To view the password you are typing, click the eye icon next to the input field.
Remember Me (Checkbox) - When checked, your session credentials will be stored in the browser to keep you logged in across visits. ⚠️ Recommended only for trusted, private devices.
Sign In Button - Click to submit your credentials and access the system dashboard.
Language Selector - Located at the top-right corner of the page, click the globe icon to select your preferred interface language.
⚠️ Tip for Admins: After initial setup, it is strongly recommended to change the default password and create separate user accounts with appropriate access levels for team members.
Please enter your valid login and password and click Sign in. After installation you can use the default credentials: admin/admin.
License activation
To activate Cluebase VMS, you must obtain a valid license file. Licenses can be requested either online or offline, depending on your system’s connectivity.
This section guides you through requesting and applying a license via the built-in interface.
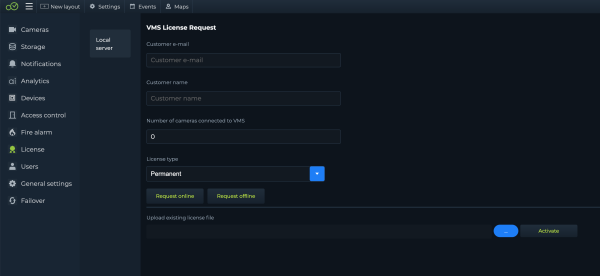
Go to Main menu -> Settings -> License and fill the VMS license request form.
License Request Fields
Customer e-mail - Enter a valid email address. This is used for identifying your license request and receiving the license key.
Customer name - Enter the full name of the company or person to whom the license will be issued.
Number of cameras connected to VMS - Specify the total number of cameras that will be used with the VMS instance. The license will be bound to this number.
License type - Select the type of license required:
- Permanent – Full license without expiration
- Temporary - trial or demonstration license which is valid only for a limited period.
Request Options
- Request online - Sends the license request directly from the VMS interface to the licensing server. Requires internet connectivity.
- Request offline - Generates a license request file that can be manually sent to the licensing provider via email or file upload, useful for air-gapped or isolated systems.
Activating a License
If you have already received a license file:
- Click the … button to browse and select the .lic file.
- Click Activate to apply the license to your system.
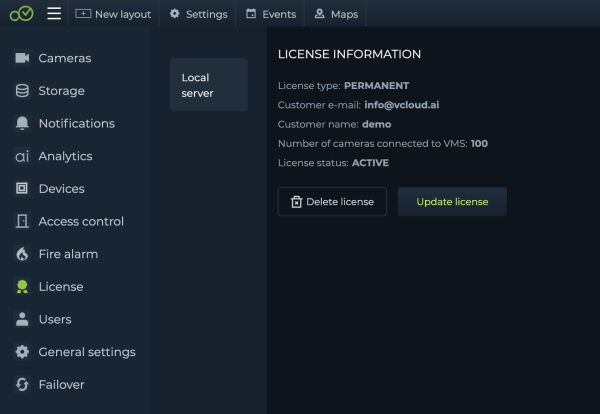
✅ After successful activation, the system will be fully operational according to the camera count and features included in your license. 🔗 Licensing is subject to the End User License Agreement (EULA)
The Main Menu provides quick access to all core features of the Cluebase VMS platform. Located on the left-hand side of the interface, it allows operators to switch and create Layouts, quick access to all cameras from all servers, manage maps, view events and reports, switch interface languages, and access system settings.
Layouts
Allows users to create and switch between custom camera grid layouts for live viewing. Clicking the dropdown shows available layout presets.
Camera tree
Displays all available cameras and devices organized by server.
Shows camera lists grouped by server name.
Each camera is indicated by a red or green dot (offline/online).
You can drag individual cameras to a layout for instant camera access
Navigation Icons
Maps - Opens the map editor where you can place and monitor camera feeds on a floor plan or site map.
Events - Access event history with filters and event details.
Reports - Generate and view reports from events.
Settings - Opens system-wide configuration options including server, camera, user, and video analytics settings.
User Section
Username (e.g., admin) - Indicates the currently logged-in user. Different permissions may be available depending on the user role.
Log out - Ends the session and returns to the sign-in screen.
Language Selector - Switch the interface language. Click the globe icon to choose from supported languages.
Adding cameras
Watch How to add cameras video in Cluebase VMS Tutorials on YouTube
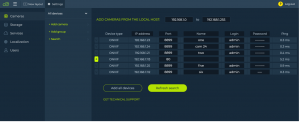
Camera search tool
Camera search tool is available to simplify and speed up cameras discovery and connection processes.
Go to Settings->Cameras->Search
All supported cameras in the local network will be found automatically (normally within 5-10 seconds).
After specifying cameras’ credentials (name/login/password) you can add them one by one using the ‘+’ button on the left
Or you can click Add all devices to add all cameras with the specified credentials.
Click Refresh search to search the network again.
You can specify the search range manually.
By default the system will search in the current subnet.
Add cameras manually
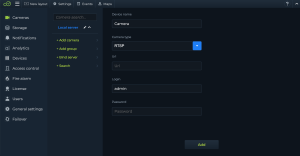
Go to Settings->Cameras->Add camera
Name the camera, select connection type, fill the IP address and port for ONVIF or the URL for the RTSP, fill Login and Password with camera’s credentials, select the time zone then click Add.
Create a New Layout for the cameras as follows below.
Layouts
Watch Creating a New Layout video in Cluebase VMS Tutorials on YouTube
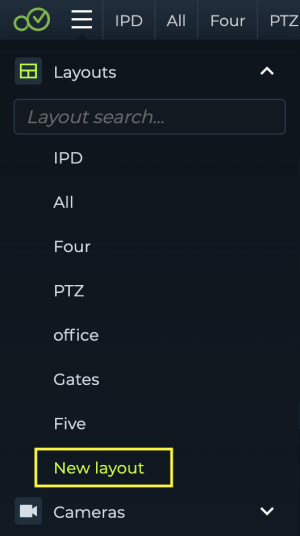
Click New layout in the main menu
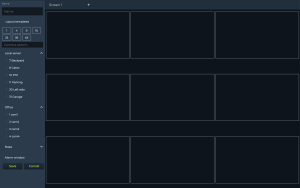
The Layout editing page will open The Layout Menu allows users to build and customize multi-camera viewing grids. It provides a powerful and flexible way to monitor multiple video streams simultaneously, tailor layouts for different screens, and enable fast response to alarms via dedicated views.
Give your new layout a Name, choose Layout template and drag’n’drop cameras or whole groups to the layout grid on the right-hand side.
Layout Configuration Panel (Left Side)
Name Field - Enter a custom name for the current layout (e.g., “Main Gate View” or “Night Shift”).
Layout Templates - Select a predefined grid layout by choosing one of the available options:
1, 4, 9, 16, 25, 36, or All (scrollable 3x3) – depending on how many cameras you want to view at once.
Camera Search - Use the input field to quickly find a camera by name or number from all registered devices.
Camera Tree - Lists all available cameras, organized by server (e.g., Local server and Office).
Cameras are labeled by their names/numbers and can be dragged and dropped into any cell in the layout grid.
Maps - If configured, maps can be added as a layout element for geospatial visualization of camera locations.
Alarm Window - A special video tile that automatically switches to display the live feed of the camera that most recently triggered an event or alarm.
Video wall configuration
Displays the currently selected screen layout (e.g., Screen 1).
Each empty box is a slot where a camera can be placed.
Cameras can be dragged from the left panel into any grid cell.
Use the + button at the top to add additional screens to your workspace (e.g., for multi-monitor setups).
Click Save to save your layout.
To edit existing layouts, click the Pencil button in the layout tab menu at the top of the screen:
When the layout is opened on the screen you can drag&drop the video windows and layout tabs to re-order them. The changes are saved automatically.
Pan Tilt Zoom (PTZ)
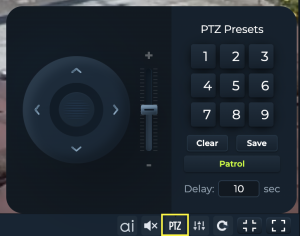
The PTZ (Pan-Tilt-Zoom) Control Menu provides intuitive, real-time control over PTZ-capable cameras. This allows operators to manually or automatically move the camera to desired views, zoom in/out, and trigger preset positions or patrol sequences.
⚠️ Note: PTZ option must be enabled in individual camera settings menu (Main menu -> Settings -> Cameras) for PTZ and motorized zoom cameras only.
Manual PTZ Control
Directional Pad - Use the central control wheel to move the camera:
Up / Down / Left / Right – Tilt or pan in the selected direction
Center circle – Stops movement when clicked (if applicable)
Zoom Slider
+ to zoom in
– to zoom out
Drag the slider to smoothly adjust zoom level
PTZ Presets
Numbered Buttons (1–9) - Press a number to move the camera to a previously saved preset position.
Save - choose a number (1–9), after adjusting the camera’s position, then press Save to save the current PTZ position as a preset.
Clear - Clears the selected preset position, freeing it for reconfiguration.
Patrol Mode
Patrol Button - Activates automatic patrol mode, cycling through all saved presets in numeric order.
Delay (seconds) - Sets the time delay between each preset position during patrol mode.
Example: 10 sec means the camera will stay at each preset for 10 seconds before moving to the next.
Multi-server functionality
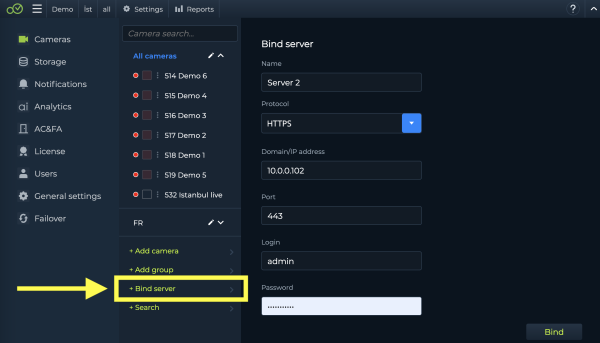
Cluebase VMS allows for creating multi-server systems in order to:
- Manage all servers and cameras from a single client
- Creating unified layouts containing cameras from multiple-server
- Receiving alarms from multiple servers to a single client.
Go to: Main menu -> Settings-> Cameras -> Bind server
Fill the server access fields and click bind.
Storage settings
General storage settings
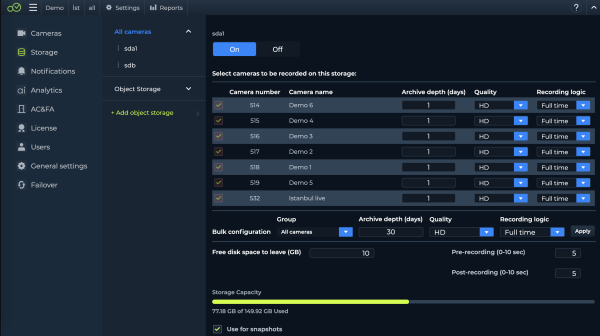
To access the storage settings go to: Main menu -> Settings-> Storage
To enable a storage volume for recording please select the storage volume and switch it on:
Then select the cameras that are required to be recorded, set archive depth, select quality and click Save. The storage will be activated for recording immediately.
By default the VMS should identify all mounted drives from the system.
To use multiple storage drives, you need to mount the disks in the operating system and restart the VMS.
The file system on the drives must be EXT4.
Configuring NAS (Network Attached Storage) and iSCSI storage
To use NAS storage in Cluebase VMS you need to mount the NAS drive in the operating system, then within 2 minutes Cluebase VMS will automatically connect the mounted NAS drive.
Here is some important points to consider:
The system does not provide any interface to connect storage to the server, you would need to do it manually. Here are some articles that can be used to follow the procedure:
- https://ubuntu.com/server/docs/service-iscsi
- https://www.seagate.com/gb/en/manuals/lyve-mobile-rackmount-receiver/iscsi-network-setup-linux-ubuntu-debian/
Once the storage is added to the server with "open-iscsi" utility, there is no need to restart VMS. The server periodically checks available storages (every 4 minutes) and when it notices some NAS storage that is not used yet, it will automatically mount it and add to the system.
Also during this check the server checks if storage is still connected or file system became readonly (may happen if ISCSI connection interrupted for some time). Basically the system checks everything to keep the disk status up to date and manage all related processes such as mounting/remounting/archive recording etc.
The same NAS storage can be also configures on failover servers so archive written from the main server will be available from the failover server.
Time settings
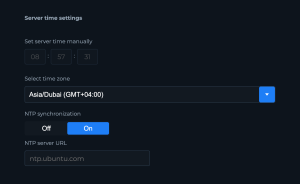
Accurate server time is crucial for reliable event logging, video timestamping, and synchronization across systems. This section allows you to configure the VMS server time manually or automatically via NTP. Go to Main menu->Settings->General settings->Time settings:
Set Server Time Manually
Use the hour, minute, and second input fields to manually adjust the system clock.
This method is useful if NTP synchronization is disabled or unavailable.
Select Time Zone
Choose your local time zone from the dropdown list.
The format is Region/City (GMT offset).
NTP Synchronization
On / Off Toggle - Enable this option to automatically synchronize the server time using an NTP (Network Time Protocol) server. This helps maintain consistent and accurate time over long periods.
NTP Server URL - Specify the NTP server to sync with. Default: ntp.ubuntu.com You can change this to any preferred time server (e.g., pool.ntp.org or a local NTP server).
User access management
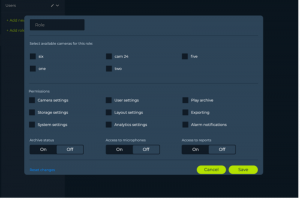
Managing roles Go to Settings->Users->Add role
Name the role and grant access to specific cameras and functions. Click save.
Please note that all users with this role will then have access to the specified cameras and functions.
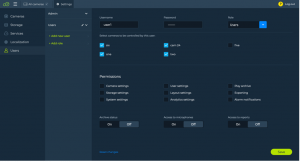
Managing users Go to Settings->Users->Add new user
Specify the new user credentials: Username, Password and the required Role. Access granted to the selected Role is be indicated below but is not available for editing. To edit the permissions you need to edit the Role by clicking the pencil button
Managing organisations
By default all roles and users are added to the root organisation. If you need one extra user access layer for multi-tenancy then create more organisations and create roles and users under them.
Maps and floor plans
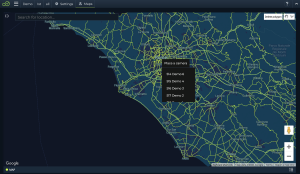
The Maps menu allows you to visualize and monitor camera locations on both interactive maps and floor plans, making it ideal for real-time spatial awareness, site overview, and coordinated security response.
To be able to locate a camera/alarm sensor/door on map or floorpan you can configure that in the Map menu. Go to Main menu->Maps then click “+” add to create a map layout item. Follow instructions on the splash screen to create a map. Right click any location on the map to place a camera/alarm sensor/door. Add the map to Layouts to keep it in sight when working with cameras.
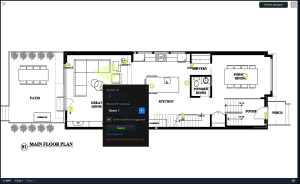
The Floor Plan Editor allows you to place and bind cameras, sensors, and doors directly onto architectural diagrams of your site. This provides a visual overview of system components and enables operators to quickly identify, monitor, and react to events spatially.
Sensor Settings Panel
When clicking a sensor icon, the following configuration panel appears:
Sensor ID - A unique identifier for the sensor. This is used for internal referencing and integration.
Bind with Camera - Use the dropdown to link the sensor to a specific camera. When the sensor is triggered, the bound camera will be displayed automatically.
Blink Red When Triggered - When enabled, the sensor icon on the map will blink red in real time upon activation.
Edit Location - Allows repositioning the sensor icon on the map without removing it.
Remove Sensor from the Map - Deletes the sensor icon from the floor plan.
Save Button - Confirms and applies changes to the selected sensor.
Floor 1 / Floor 2 - Navigate between multiple floors or levels of your facility. Each tab represents a separate floor plan layer where different devices can be placed.
Camera groups
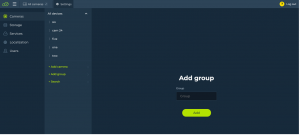
Go to Settings->Cameras->Add group and fill the group name field. Then click “Add”
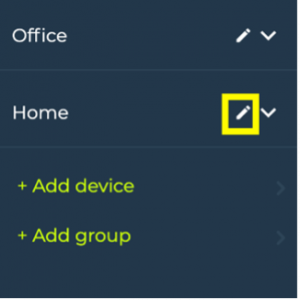
To edit a group click the ‘pencil’ icon on the right side of the group.
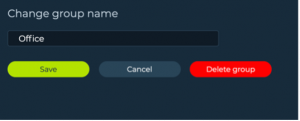
Now you can edit or delete the group.
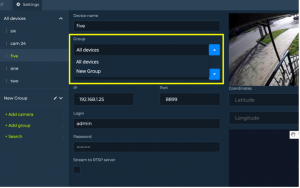
To add a camera to a particular group go to camera settings and select the required group.
💡 It is also possible to drag&drop cameras into the groups with mouse.
Video stream settings
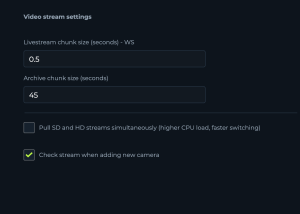
The system allows for video stream management in Settings -> General settings -> Video stream settings:
In this menu there are controls that allow you to configure how video data is handled for live viewing and archiving. Adjust these settings to balance performance and video quality based on your system’s capabilities and use case.
Livestream chunk size (seconds) - WS Defines the chunk duration (in seconds) used for live video streaming over WebSocket. Smaller values reduce latency but may increase CPU/network load.
Archive chunk size (seconds) Sets the duration of video chunks stored in the archive. Longer chunks reduce the number of files and may optimize storage, but can increase access time when reviewing archives.
Pull SD and HD streams simultaneously When enabled, the system will retrieve both Standard Definition and High Definition streams at the same time. This can improve stream switching speed but may significantly increase CPU load. Default: Disabled
Check stream when adding new camera When enabled, the system automatically verifies the video stream upon adding a new camera. This helps ensure that the camera is correctly connected and streaming before it is added to the system. Default: Enabled
Video analytics
General information
Cluebase VMS provides robust support for a variety of video analytics technologies, offering flexibility for different deployment scenarios and user requirements. The system supports six types of video analytics, each designed to meet specific needs:
- Embedded Video Analytics Includes standard detectors such as:
- Motion Detection
- Camera Sabotage Detection
- Object Detection
- Face ID Lite
- Additional AI Modules These specialized detectors are available as add-ons:
- Smoke & Fire Detection
- PPE (Personal Protective Equipment) Detection
- Traffic Analytics
- YOLO Custom Video Analytics Integrate your own custom-trained models using the YOLO (You Only Look Once) architecture for object detection tailored to specific use cases.
- Visual Assistant – LLM-based Analytics A cutting-edge module powered by large language models (LLM) for advanced, customizable video analytics workflows using natural language logic.
- VCA Enhanced Video Analytics Pack An advanced plugin-based solution that expands analytics capabilities significantly. 👉 View VCA Analytics Manual
- 3rd Party Video Analytics Modules The VMS can integrate with external analytics providers, allowing flexible support for various industry-specific solutions.
Embedded AI video analytics
Cluebase VMS has got a wide variety of embedded video analytics.
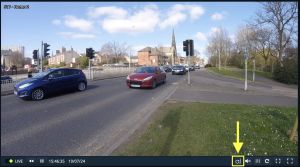
Click the ![]() bottom at the bottom of the video window to open the video analytics settings of the current camera.
bottom at the bottom of the video window to open the video analytics settings of the current camera.
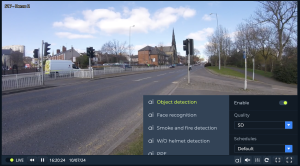
In the ![]() menu choose the desired video analytics detector, enable, configure it and click
menu choose the desired video analytics detector, enable, configure it and click ![]() to apply the settings.
to apply the settings.
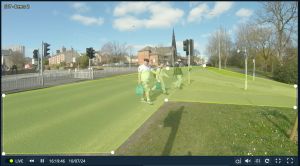
When required, enable the View zone option in the detector settings to use the detection zone (mask).
Additional AI Modules
Cluebase VMS supports advanced AI-powered detectors that go beyond the standard embedded analytics. These modules are available as optional components and include:
- Smoke & Fire Detection
- PPE (Personal Protective Equipment) Detection
- Traffic Analytics
⚠️ Important: These features require the installation of the dedicated ai container on your system.
During the installation process, the system will prompt the user with the following message in the console:
Cluebase VMS analytics module will take 6 GB of free space. Would you like to proceed? Press 'y' to install or any other button to skip.
- If the user presses y, the AI container will be installed, enabling the Additional AI Modules to function within the VMS.
- If the user presses any other key, the installation will skip the AI container, and these modules will not be available. In this case, attempts to use the Additional AI Modules in the VMS will result in the following error message: “Analytics server is unavailable.”
To ensure these features are active and operational, make sure the AI container is installed during setup.
If the ai container is installed the Additional AI Modules will function in the same way as the Embedded analytics.
YOLO Custom Video Analytics
Cluebase VMS supports the integration of custom-trained YOLO models for tailored video analytics solutions. This feature is ideal for users who need to detect highly specific objects or behaviors not covered by standard detectors.
⚠️ Note: Just like the Additional AI Modules, this feature requires the ai container to be installed. If the container is not installed during setup, the system will not be able to run custom YOLO models and will return the error: “Analytics server is unavailable.”
Key Capabilities:
- Users can upload and run their own YOLO models in .pt (PyTorch) format.
- Models can be trained using custom image datasets, for example using platforms like Roboflow, which simplifies dataset preparation, labeling, and model training.
- Once deployed, these models can be applied to camera streams via the AI menu in the Cluebase VMS interface.
This capability empowers organizations to implement highly specialized detection use cases, such as identifying unique equipment, behaviors, or industry-specific events.
To use a user-trained YOLO model (e.g., created with Roboflow) for custom object detection, follow these steps in the Cluebase VMS interface:
- Go to Main menu -> Settings -> Analytics -> Custom AI model (YOLO)
- Select “New model” In the Model dropdown field, choose “New model” to indicate you are adding a new one to the system or select an existing model
- Enter a Name In the Model name field, give your model a descriptive name. Example: Drone detection model
- Upload Your Model File Click the “…” button next to the Model file field to browse and upload your YOLO .pt model file. Example: drone-detection.pt ⚠️ Make sure the model is in .pt format and has been trained correctly using platforms like Roboflow or other YOLO-compatible tools.
- Click “Add” Once the model file and name are filled in, click the “Add” button at the bottom right to save and upload the model.
Once added, your custom YOLO model will appear in the ![]() menu list in Layout video window and can be configured and used in the same way as the Embedded analytics.
menu list in Layout video window and can be configured and used in the same way as the Embedded analytics.
Visual Assistant
The Visual Assistant feature introduces a groundbreaking approach to video analytics by allowing users to define detection logic using natural language. Powered by large language models (LLM), this module makes it easy to create custom detection scenarios without any coding or model training.
Visual Assistant lets you create powerful, context-aware detection rules by simply describing them in plain text. For example: “Answer only 'yes' when you detect a fight ”
The system interprets the rule, applies it to the video stream, and begins detecting accordingly.
Installation
To enable the Visual Assistant:
- Go to Main menu → Settings → Analytics → Visual Assistant
- Click the Install button
⚠️ System Requirements: This feature requires a GPU with CUDA support. Check the list of supported GPUs here: Supported GPU List
If the system does not have a compatible GPU, the installation will not proceed, and the Visual Assistant functionality will be unavailable.
Creating a New Detection Rule in Visual Assistant
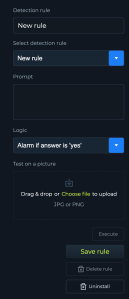
The Visual Assistant interface allows you to define a custom video analytics rule using a natural language prompt. Follow these steps to add a new rule:
1. Start a New Rule
In the “Detection rule” field, type the name of your new rule.
Example: Fight detection
2. Select Detection Rule
From the “Select detection rule” dropdown, choose “New rule” if this is your first time creating it.
Once saved, it will appear here for reuse or modification.
3. Write the Prompt
In the Prompt field, describe what the AI should detect in plain language.
Example:
say only 'yes' if you see a real fight 💡 The AI will evaluate each frame based on this instruction and return a simple response such as “yes”, “no”, or a count.
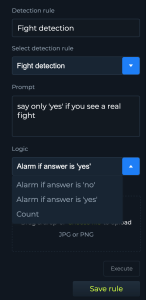
4. Define Logic
- Use the Logic dropdown to define how the system should react to the AI’s answer:
- Alarm if answer is ‘yes’ – triggers an alert when the model replies “yes”
- Alarm if answer is ‘no’ – triggers an alert when the answer is “no”
- Count – returns a numerical count instead of triggering an alarm
5. Test the Rule (Optional)
- Upload a sample image (JPG or PNG) under “Test on a picture” to verify how your prompt performs before saving it.
- Click Execute to run the prompt on the image.
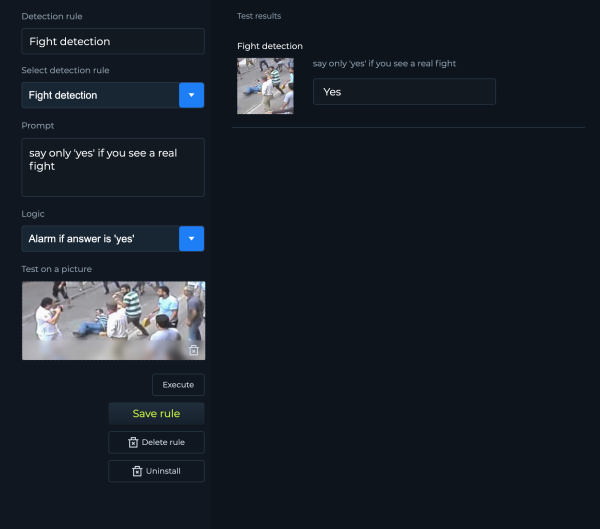
Example: This screenshot demonstrates how a user has configured a custom detection rule using the Visual Assistant module to detect fights in a video feed using natural language AI logic.
Configuration Breakdown:
Detection rule name: Fight detection – This is the custom name given to the rule for easy identification.
Prompt: say only 'yes' if you see a real fight – This is the natural language instruction given to the Visual Assistant. It tells the AI to analyze the input and return “yes” only if an actual fight is seen.
Logic: Alarm if answer is 'yes' – This setting defines what happens based on the AI’s answer. If the AI returns “yes”, the system will trigger an alarm.
Test Image: The user has uploaded a photo showing a chaotic scene that includes multiple people, with one person on the ground – potentially indicating a fight. This image is used to test the rule before deploying it on live video.
Test Result (on the right): The system executed the prompt and returned:
➜ “Yes” – meaning the AI detected what it interpreted as a real fight, and based on the defined logic, this would trigger an alert in the VMS.
Outcome:
- The user validated that the detection logic works correctly with a test image.
- Once satisfied, the user can click “Save rule” to apply this logic to live video streams.
6. Save the Rule
Once you’re satisfied with your settings, click “Save rule” to apply it. Once saved, your custom detector will appear in the ![]() menu list in Layout video window and can be configured and used in the same way as the Embedded analytics.
menu list in Layout video window and can be configured and used in the same way as the Embedded analytics.
VCA video analytics
Cluebase VMS can natively connect VCA video analytics platform that integrates a variety of 3rd party video analytics plugins.
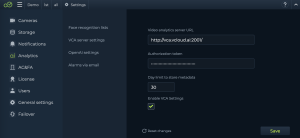
To connect a VCA server to Cluebase VMS go to: Main menu -> Settings -> Analytics -> VCA server settings.
Add the required information to the fields, select 'Enable VCA settings' option and click save. VCA server is connected.
Go to the ![]() menu to use and configure the VCA-based video analytics detectors.
menu to use and configure the VCA-based video analytics detectors.
If the VCA server is connected to the VMS then the VCA modules will function in the same way as the Embedded analytics.
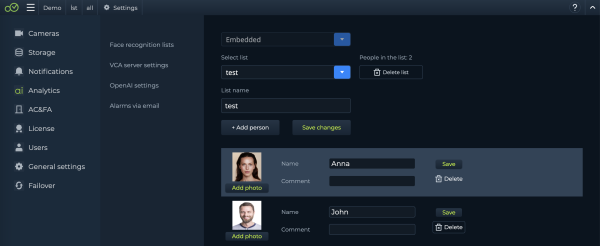
Face recognition lists
To use the face recognition lists go to Main menu -> Settings -> Analytics -> Face recognition lists.
Face recognition lists menu allows for creating, editing and deleting face lists for the embedded and VCA face recognition detectors; adding and deleting faces to the lists.
LPR lists (vehicle license plate recognition lists)
To use the LPR lists go to Main menu -> Settings -> Analytics -> LPR lists *only available if VCA server is configured.
Use this menu to create, edit and delete LPR lists for the VCA LPR detector; also for adding and deleting license plate numbers to the lists.
Alarm panel
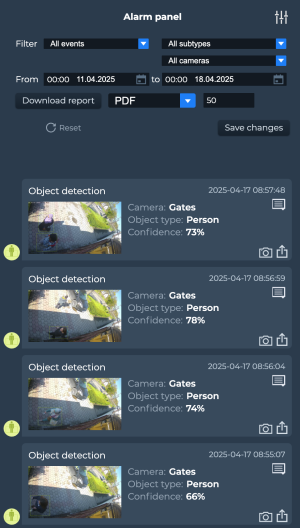
The Alarm Panel provides a centralized view of all system-detected events such as object detections, motion alerts, and camera-triggered events. Users can filter, review, and export event data with visual context, making it ideal for real-time monitoring and post-incident analysis.
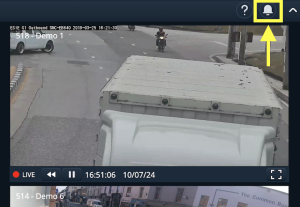
To view video analytics and system events in real time, open the Alarm Panel by clicking the bell button in the top right corner of the layout.
Filters and Search
Use the top section to filter and search through events:
Event Type Dropdown: Filter events by type (e.g., Object Detection, Motion, Intrusion).
Subtype Dropdown: Further refine the event category (e.g., Person, Vehicle).
Camera Selection: Filter events based on specific camera(s).
Date and Time Range: Define a time window to narrow down the search using the From and To fields.
Reset: Clears all filters and restores the full event list. Report Download
Download report Export the list of filtered events in your chosen format. Supported formats: PDF (default)
Results per page Adjust the number of events displayed or included in the report (default is 50).
Save changes Applies any new filters or settings you’ve selected above.
Each entry in the list includes:
Snapshot thumbnail A preview image from the moment the event occurred.
Event Type (e.g., Object detection)
Camera name Indicates which camera triggered the event.
Object type Classifies the detected object (e.g., Person, Vehicle).
Confidence level Displays the AI’s certainty in the detection as a percentage.
Timestamp When the event was recorded.
Event Action Buttons (Right side of each event)
Comments - Opens a comment box where operators can annotate the event for internal reference or shift handovers.
Download Event Snapshot - Instantly downloads the image frame associated with the event detection.
![]() Download Event Video Clip - Instantly downloads a short video clip from the moment of the event, useful for incident review or evidence archiving.
Download Event Video Clip - Instantly downloads a short video clip from the moment of the event, useful for incident review or evidence archiving.
Double-click the bell button to adjust notification sound volume.
Exporting and importing VMS configuration
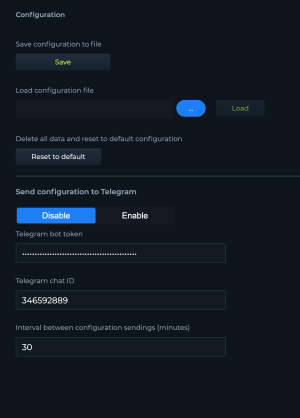
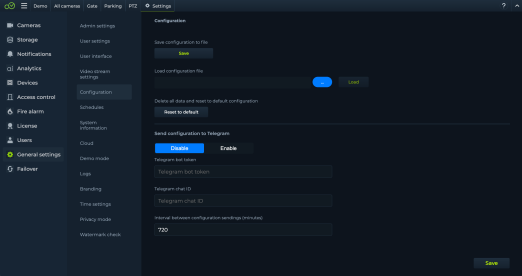
This section allows you to export, import, and reset your system configuration, as well as optionally send configuration backups to Telegram at regular intervals.: Main menu->Settings->General settings->Configuration:
Save and Load Configuration
Click the Save button to export the current configuration settings to a file. This is useful for backups or transferring settings to another system.
Load configuration file - Click the … button to select a previously saved configuration file from your device, then press Load to import it into the system.
Reset to default - Restores the system to its original factory configuration.
⚠️ Warning: This action will delete all custom settings and cannot be undone.
Send Configuration to Telegram
This feature allows automatic backups of your configuration to be sent to a designated Telegram chat using a bot.
Enable/Disable - Use these buttons to activate or deactivate automatic Telegram sending.
Telegram bot token - Enter the API token for your Telegram bot. This bot must be created beforehand using @BotFather on Telegram.
Telegram chat ID - Specify the chat ID where the configuration file will be sent. This could be a personal chat or a group chat with the bot added as a member.
Interval between configuration sendings (minutes) - Sets how often the configuration file will be sent to Telegram.
Notifications
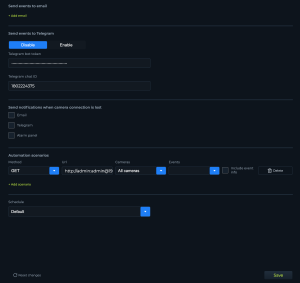
This section enables you to configure how the system sends alerts and notifications in response to various events or system states such as video analytics alarms and camera disconnections. You can send alerts via email, Telegram, or to an external alarm panel, and also automate custom responses using predefined scenarios. Go to Main menu->Settings->Notifications:
Send Events to Email
+ Add email - Click this link to add one or more email addresses where event notifications will be sent. The system will notify these addresses based on selected triggers.
Send Events to Telegram
Enable / Disable - Toggle Telegram event notifications on or off.
Telegram bot token - Enter your Telegram bot’s API token here. You must create the bot first via @BotFather.
Telegram chat ID - Specify the chat ID where the event notifications will be sent. This can be an individual or group chat where the bot is present.
Send Notifications When Camera Connection Is Lost
Select how you want to be notified if a camera goes offline:
Email – Sends an email alert.
Telegram – Sends a message via Telegram.
Alarm panel – Sends a signal to the alarm panel.
Automation Scenarios
This feature allows you to automate responses to certain events from selected cameras.
Method - Choose between HTTP methods like GET or POST to define how the external system will be contacted.
URL - Specify the endpoint to be triggered when the scenario conditions are met (e.g., http://admin:admin@192.168.1.1/...).
Cameras - Select one or more cameras that will trigger this automation.
Events - Choose which events (e.g., motion detection, disconnection) will activate the scenario.
Include event info - Enable this option if you want to pass detailed event data in JSON file.
Delete - Click this to remove a scenario.
+ Add scenario - Add a new automation scenario with custom parameters.
Schedule
Assign a specific pre-created schedule to the automation or notification rules to receive notifications only in scheduled hours.
Reports
Cluebase VMS allow for creating graphical reports on counting based video analytics.
To open the Reports go to Main menu -> Reports.
Cloud features
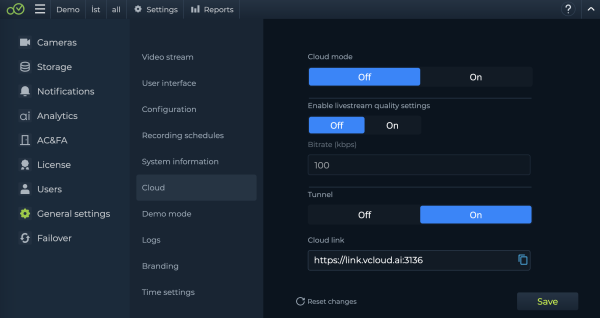
Cluebase VMS contains the following cloud features:
- Cloud mode: optimises the VMS for cloud usage avoiding unnecessary traffic between servers in multi server architecture and also limits VMS to camera connection to one.
- Livestream quality: enables server side transcoding of the live streams to specified bitrate. This doesn't affect the archive recording quality. Please note that this feature requires significant CPU resources.
- Tunnel: enables secure tunnel between the server and vCloud.ai CloudLink service that makes the local server accessible from any location via Internet. Once enabled, the CloudLink URL will be displayed on the screen. Please make sure that you are using a strong admin password before you activate the tunnel.
To access the cloud settings go to Main menu->Settings->General settings->Cloud
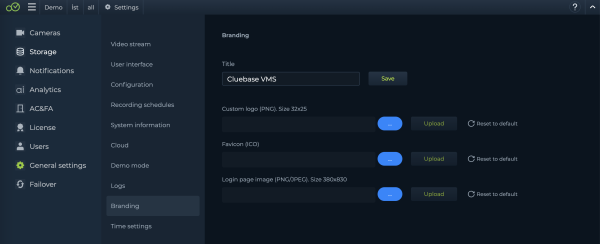
Branding
Cluebase VMS allows for applying user branding: logo, app title, favicon and login page image.
Logs
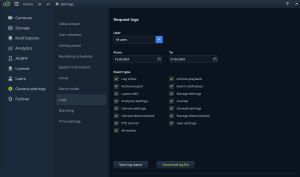
The Logs menu provides tools for auditing system activity by generating detailed reports of user actions, configuration changes, camera events, and system operations. This is essential for system administrators who need to monitor usage, investigate issues, or maintain compliance.
Go to Main menu->Settings->General settings->Logs. Configure filters in the way you need selecting specific users, time frame and event types. Click View Log Report to open the report in a separate tab or Download the text file version.
Filters
User Dropdown - Select a specific user to filter logs by activity associated with that user account, or choose All users to view system-wide logs.
Date Range (From / To) - Use the calendar pickers to define the time range for the logs you want to retrieve.
Event Types
Select one or more categories of logged actions to include in the report:
Log in/out – User login and logout actions
Archive export – Archive data exported by users
Layout edit – Changes to camera layouts
Analytics settings – Modifications in video analytics configurations
Camera settings – Changes made to camera configurations
Camera disconnected – Logs when a camera becomes unreachable
PTZ control – PTZ (Pan-Tilt-Zoom) operations initiated by users
Archive playback – Logs when archived video is viewed
Event notification – Logs related to triggered events and alerts
License – License activation, updates, or issues
General settings – Changes to general system preferences
Storage settings – Changes to storage configuration
Storage disconnected – Logs when storage devices are lost or reconnected
User settings – Modifications to user accounts or permissions
All events – Quickly enables all event types for full auditing
✅ Checked boxes indicate which types of logs will be included in the generated report.
Failover
The Failover Menu allows administrators to configure redundant servers that automatically take over video processing and management duties in case a primary server fails. This ensures system high availability and service continuity, which is essential in mission-critical environments like security and surveillance.
Go to Main menu -> Setting -> Failover:
Cluebase VMS supports failover (hot swap) functionality as the following options:
- 1 to 1 - every server in the system has a failover server
- Many to 1 - several servers can be hot-swapped by 1 failover server
- Many to Many - several servers can be hot-swapped by several failover servers
Please note:
- In case of using the failover functionality it’s important to make sure that network storage is being used (Object storage or NAS)
- Failover server hardware should be able to handle the required number of cameras so the failover servers’ hardware should be precisely calculated and configured.
- Configuration is automatically sent from main server to failover every 5 minutes
Set up:
To set up a failover system you need to have at least 1 main server and 1 failover server.
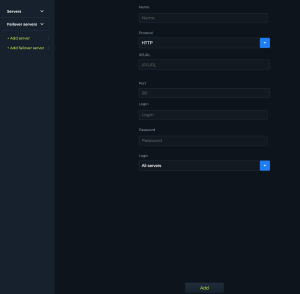
Go to the main server user interface and open Failover settings: Settings->Failover->Add Failover Server and fill the fields with Failover server credentials. In the Logic field choose the server or servers that should be hot-swapped by the current Failover server. Then click Save.
Factory reset option
The Factory reset option allows you to clear all existing data and revert the system settings to their original default state.
Go to Main menu -> Settings -> General settings -> Configuration
Use the Reset to default button to delete all current system data and restore the default configuration.
Server auto-reboot configuration
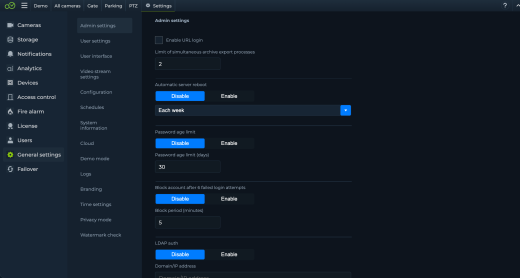
The Automatic server reboot configuration allows you to schedule periodic restarts of the server.
Go to Main menu -> Settings -> General settings -> Admin settings
- Use the Enable button to activate the automatic server reboot.
- Select the reboot frequency from the dropdown list (e.g., Each week).
Update & Restart the server
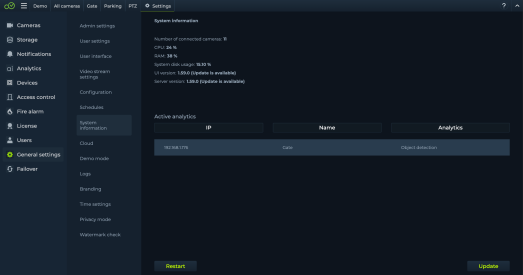
Go to Main menu -> Settings -> General settings -> System information
Update the system
- Use the Update button placed in the bottom right to upgrade the UI and Server to the latest available version.
Restart the server
- Use the Restart button placed in the bottom left to restart the server.
Technical support
vCloud.ai technical support is operating 24/7, the average reply time is 3 hours. Technical support can be requested via email: support@vcloud.ai
